API Interface Description
1 Overview
Elephant Robotics allow users to remotely control the robot using Socket. We use tcp protocol to communicate between the client and the robot, you can send the formated string through tcp to get or set some property/state of the robot, the format for each function are introduced as bellow.
2 Socket String format rules
2.1 get current angles of robot
Socket string format: get_angles()
- Function: get angls of all joints
- Return value:
listA list of floating point values representing the angles of all joints - Example: If the call was successful and will receive get_angles:[0.174058, 0.520382, -0.07874, 0.092855, 0.0, 0.030356],If any error occurs, the InvalidAngles() function will be returned(defined as : [-1.0, -2.0, -3.0, -4.0, -1.0, -1.0])
2.2 set the angles of robot
Socket string format: set_angles(joint1_angle, joint2_angle, joint3_angle, joint4_angle, joint5_angle, joint6_angle,speed)
- Function: Send all angles to all the joints of the robot arm
- Parameters:
joint1_angle: Joint 1 angle ,range -180.00 ~ 180.00joint2_angle: Joint 2 angle ,range -270.00 ~ 90.00joint3_angle: Joint 3 angle ,range -150.00 ~ 150.00joint4_angle: Joint 4 angle ,range -260.00 ~ 80.00joint5_angle: Joint 5 angle ,range -168.00 ~ 168.00joint6_angle: Joint 6 angle ,range -174.00 ~ 174.00speed: Motion speed,range 0 ~ 2000
- Example: set_angles(10.0,11.0,12.2,12.3,11.1,16.0,500) ,If the call was successful and will receive set_angles:[ok] ,If any error occurs, will receive set_angles:error_message
2.3 set the angle of one joint
Socket string format: set_angle(joint,angle, speed)
- Function: Send angle to the specified joint
- Parameters:
joint: J1 / J2 / J3 / J4 / J5 / J6angle: Refer to the parameter description of set_angles() for details about the angle range of each jointspeed: Motion speed, range 0 ~ 2000
- Example: set_angle(J1,50.5,500),If the call was successful and will receive set_angle:[ok],If any error occurs, will receive set_angle:error_message
2.4 get current coordinates of robot
Socket string format:get_coords()
- Function: get current coordinates of robot
- Return value:
listA list of coordinates and poses of length 6, sequentially[x, y, z, rx, ry, rz] - Example: If the call was successful and will receive get_coords :[0.174058, 0.520382, -0.07874, 0.092855, 0.0, 0.030356],If any error occurs, the InvalidAngles() function will be returned(defined as : [-1.0, -2.0, -3.0, -4.0, -1.0, -1.0])
2.5 set the coordinates of robot
Socket string format:set_coords(axis_x_coord, axis_y_coord, axis_z_coord, axis_rx_coord, axis_ry_coord, axis_rz_coord,speed)
- Function: Send the overall coordinates and attitude, so that the head of the robot moves from the original point to the specified point
Parameters:
axis_x_coord: x coordinateaxis_y_coord: y coordinateaxis_z_coord: z coordinateaxis_rx_coord: rx coordinateaxis_ry_coord: ry coordinateaxis_rz_coord: rz coordinatespeed: Motion speed , range 0 ~ 2000
Example: set_coords(10.0,11.0,12.2,12.3,11.1,16.0,500),If the call was successful and will receive set_coords:[ok],If any error occurs, will receive set_coords:error_message
2.6 set the coordinate of one axis
Socket string format:set_coord(axis,coordinate ,speed)
- Function: Send a single coordinate value to the robot for movement
- Parameters:
axis: x / y / z / rx / ry / rzcoordinate: coordinate valuespeed: Motion speed , range 0-2000
- Example: set_coord(x,50.5,500) ,If the call was successful and will receive set_coords:[ok]。If any error occurs, will receive set_coords:error_message
2.7 get the signal of digital out pin
Socket string format:get_digital_out(pin_number)
- Function: get the signal of digital out pin
- Parameters:
pin_number: 0 to 5 indicates the base electrical port OUT 1 to 6. 16 ~ 17 Corresponding to the end electrical interface of the robot OUT 1-2 (refer to the Pro600 manual for reference)
- Example: get_digital_out(1) ,If the call was successful and will receive get_digital_out:0 or get_digital_out:1 ,If any error occurs, will receive get_digital_out:error_message
2.8 set the signal of digital out pin
Socket string format:set_digital_out(pin_number,signal)
- Function: set the signal of digital out pin
- Parameters:
pin_number: 0 to 5 indicates the base electrical port OUT 1 to 6. 16 ~ 17 Corresponding to the end electrical interface of the robot OUT 1-2 (refer to the Pro600 manual for reference)signal: 1 - High, 0 - low
- Example: set_digital_out(1,1) If the call was successful and will receive set_digital_out:[ok],If any error occurs, will receive set_digital_out:error_message
2.9 get the signal of digital in pin
Socket string format:get_digital_in(pin_number)
- Function: get the signal of digital in pin
- Parameters:
pin_number: 0 to 5 indicates the base electrical port OUT 1 to 6. 16 ~ 17 Corresponding to the end electrical interface of the robot OUT 1-2 (refer to the Pro600 manual for reference)
- Example: get_digital_in(1) , If the call was successful and will receive get_digital_in:0 or get_digital_in:1 ,If any error occurs, will receive get_digital_in:error_message
2.10 change the coordinate of one axis in one direction continuously
Socket string format:jog_coord(axis,direction,speed)
- Function: Control the robot to move continuously according to the specified axis direction
- Parameters:
axis: Representing different directions, the available parameters are x / y / z / rx / ry / rzdirection: It mainly controls the direction of movement of the robot arm, -1 - negative direction ,0 - stop,1 - positive directionspeed: speed range 0 ~ 2000
- Example: jog_coord(x,1, 500) ,If the call was successful and will receive jog_coord:[ok],If any error occurs, will receive jog_coord:error_message
2.11 Changing the Angle of a joint in one direction
Socket string format:jog_angle(joint,direction,speed)
- Function: Control the robot to keep moving at the specified Angle
- Parameters:
joint: Represents the joint of the robot, and the available parameters are J1 / J2 / J3 / J4 / J5 / J6direction: It mainly controls the direction of movement of the robot arm,-1 - negative direction ,0 - stop,1 - positive directionspeed: speed range 0 ~ 2000
- Example: jog_angle(J1, 1, 500) ,If the call was successful and will receive jog_angle:[ok], If any error occurs, will receive jog_angle:error_message
2.12 enable the system
Tip: Before using this command, run power_on() to power on the robot; otherwise, the system cannot be started
Socket string format:state_on()
- Function: enable the system
- Example: state_on(),If the call was successful and will receive state_on:[ok] ,If any error occurs, will receive state_on:error_message
2.13 disable the system
Socket string format:state_off()
- Function: Shut down the system, but the robot is still powered on
- Example: state_off(),If the call was successful and will receive state_off:[ok],If any error occurs, will receive state_off:error_message
2.14 Stop the task
Socket string format:task_stop()
- Function: Stop running the program
- Example: task_stop() ,If the call was successful and will receive task_stop:[ok],If any error occurs, will receive task_stop:error_message
2.15 Set feed rate
Socket string format:set_feed_rate(speed)
- Function: Set speed
- Parameters:
speed: speed range 0 ~ 100
- Example: set_feed_rate(50.0),If the call was successful and will receive set_feed_rate: 0,return any other value and the call fails。
2.16 Put the robot to sleep briefly
Socket string format:wait(seconds)
- Function: Set system waiting time
- Parameters:
seconds: time
- Example: wait(10.5) ,If the call was successful and will receive wait:[ok],If any error occurs, will receive wait:error_message。This feature will cause the robot to "sleep" for a given few seconds, not carrying out any received instructions.
2.17 mount the robot upside down
Socket string format:set_upside_down(up_dn)
- Function: Flip the z-axis
- Parameters:
up_dn: 1 - upside down,0 - not upside down
- Example: set_upside_down(1),If the call was successful and will receive set_upside_down:[ok],If any error occurs, will receive set_upside_down:error_message
2.18 power on the robot
Socket string format:power_on()
- Function: power on the robot
- Example: power_on(),If the call was successful and will receive power_on:[ok],If any error occurs, will receive power_on:error_message
2.19 power off the robot
Socket string format:power_off()
- Function: power off the robot
- Example: power_off(),If the call was successful and will receive power_off:[ok],If any error occurs, will receive power_off:error_message
2.21 get the speed the robot
Socket string format:get_speed()
- Function: Gets the running speed in mm/s
- Example: get_speed() ,If the call was successful and will receive get_speed: speed,If any error occurs, will receive get_speed:error_message
2.22 check the state of the robot
Socket string format:state_check()
- Function: Get the robot state
- Example: state_check() ,If the robot is in normal condition, it will receive state_check:1,If the robot is not in normal condition, it will receive state_check:0,If any error occurs, will receive state_check:error_message
2.23 check if the robot is running
Socket string format:check_running()
- Function: check if the robot is running
- Example: check_running(),If the robot is running, it will receive check_running:1,If the robot is not running, it will receive check_running:0,If any error occurs, will receive check_running:error_message
2.24 set the torque limit of the robot
Socket string format:set_torque_limit(axis,torque)
- Function: Set the torque limit for the robot
- Parameters:
axis: x / y / z / rx / ry / rztorque: range 0 ~ 2
- Example: set_torque_limit(x,10.0) ,If the call was successful and will receive set_torque_limit:[ok],If any error occurs, will receive set_torque_limit:error_message
2.25 open a g_code formated text file
Socket string format:program_open(file_path_name)
- Function: open a g_code formated text file
- Parameters:
file_path_name: The absolute path of the file
- Example: program_open(/usr/a.txt) ,If the call was successful and will receive program_open:0,If any error occurs, will receive program_open:error_message
2.26 run a g_code formated text file from the given line
Socket string format:program_run(line_number)
- Function: run a g_code formated text file from the given line
- Parameters:
line_number: Number of lines of code to run
- Example: program_run(0),If the call was successful and will receive program_run:0,If any error occurs, will receive program_run:error_message
2.27 Gets robot error messages
Socket string format:read_next_error()
- Function: Robot error detection
- Example: read_next_error(),If the call was successful and will receive read_next_error:error_message
2.28 set the payload of the robot
Socket string format:set_payload(payload)
- Function: set the payload of the robot
- Parameters:
payload: range 0.0 ~ 2.0
- Example: set_payload(1.0),If the call was successful and will receive set_payload:[ok],If any error occurs, will receive set_payload:error_message
2.29 set the acceleration of the robot
Socket string format:set_acceleration(acc)
- Function: set the acceleration of the robot
- Parameters:
acc: Acceleration, which must be an integer in mm/s
- Example: set_acceleration(50),If the call was successful and will receive set_acceleration:[ok],If any error occurs, will receive set_acceleration:error_message
2.30 get the acceleration of the robot
Socket string format:get_acceleration()
- Function: get the acceleration of the robot
- Example: get_acceleration(),If the call was successful and will receive get_acceleration: accactual acceleration)
2.31 Wait for the command to complete
Socket string format:wait_command_done()
- Function: Wait until the last command completes
- Example: wait_command_done(),If the call was successful and will receive set_payload:0,If any error occurs, will receive set_payload:error_message
2.32 pause the program
Socket string format:pause_program()
- Function: Pause a running program
- Example: pause_program() ,If the call was successful and will receive pause_program:[ok],If any error occurs, will receive pause_program:error_message
2.33 resume the program
Socket string format:resume_program()
- Function: Resume the paused program
- Example: resume_program(),If the call was successful and will receive resume_program:[ok],If any error occurs, will receive resume_program:error_message
2.34 assign variable
Socket string format:assign_variable("variable_name",value)
- Function: Assign values to defined variables
- Example: assign_variable("A",10) ,assign_variable("A",10.20202) or assign_variable("B",”ABC”) or assign_variable("C",True),assign_variable("C",False)
Variable names are quoted in double quotation marks (""); If the value is an integer or floating point type, you can write the value directly without using the serial number. If the value is a Boolean type, you can write 0/1 directly using True/False, and the variable is changed to an integer type
The return string is formatted as a key-value pair, where the key is the function name and the value is the value received from the robot,If the call was successful and will receive assign_variable:[ok]。If any error occurs, will receive assign_variable:[wrong request format]。
The following is the complete instance using assign_variable("variable_name",value) :
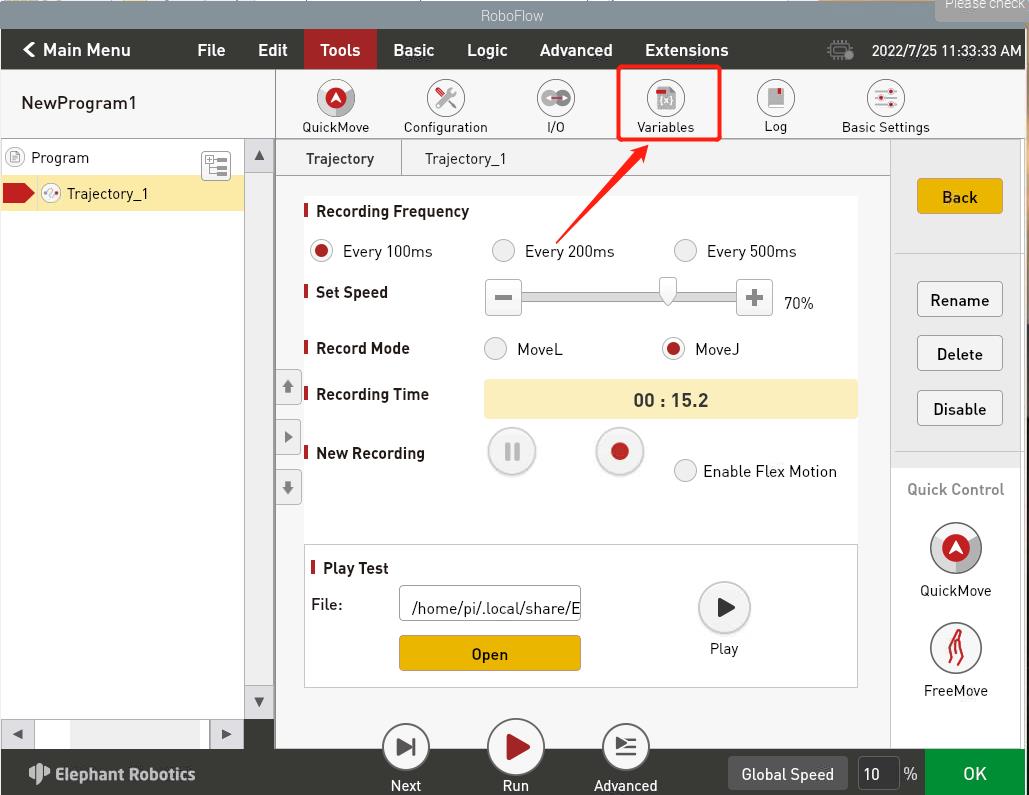
- First, to set the variable in Roboflow, click Tools -> Variables
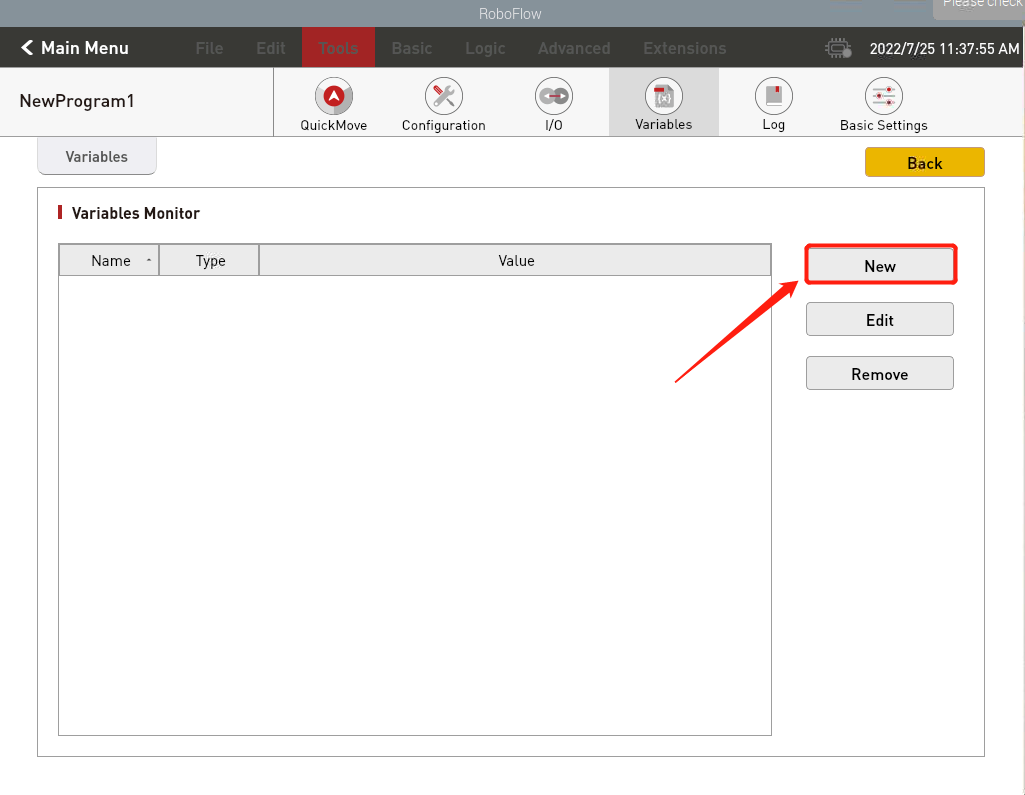
- Create a new variable, enter the variable name, and select the variable type

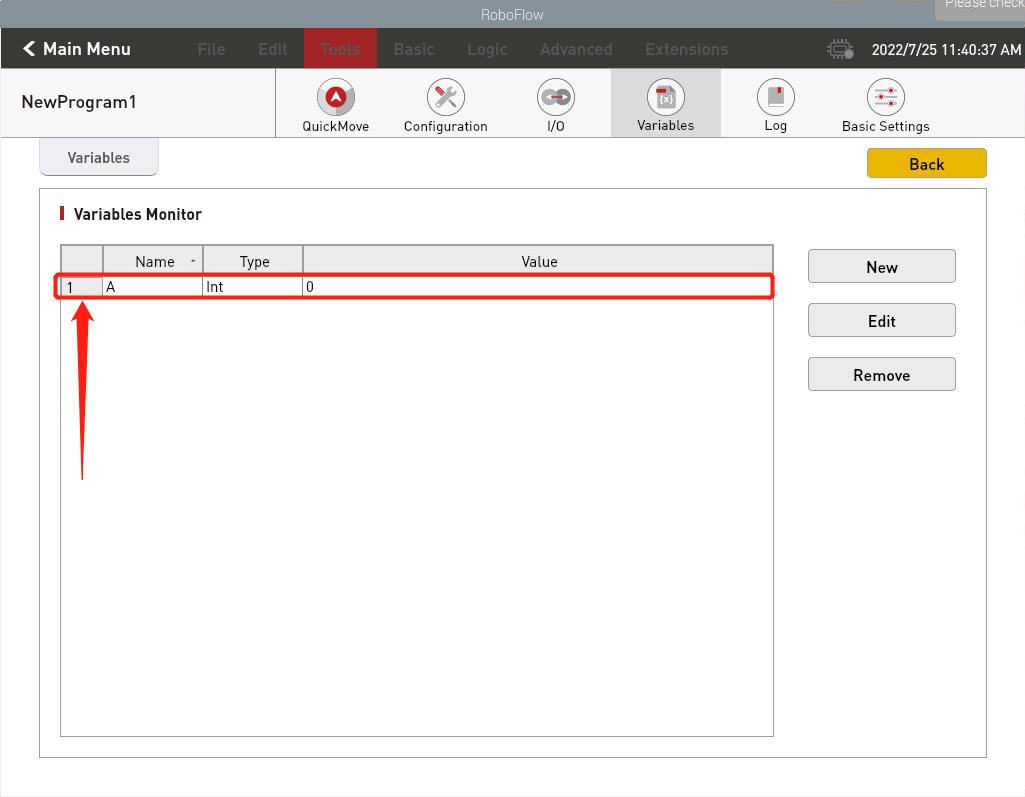
- The creation is successful, as shown in the figure
- After the variable is created successfully, the value of the variable can be set remotely through the Socket API (PS:value can be directly entered into the data type needed to be used, without changing the variable type in Roboflow, Roboflow will automatically change the variable data type according to the received data).

- As shown in the figure, both the variable type and the data were successfully changed

2.35 get the value of a variable
Socket string format:get_variable("variable_name")
- Function: get the value of a variable
Example: get_variable("variable_name"),If the call was successful and will receive get_variable:[ok],If any error occurs, will receive get_variable:error_message
2.36 upload a file
Socket string format:upload_file(base64 encoded file contents,filename,sha256 hash of contents)
- Function: upload a file to the robot
- Example: upload_file(KEVsZXBoYW50IFJvYm90aWNzKQ0KRzIxIEc5NCBHNjQgRzQwIChtZXRyaWMgZnR3KQ0KRzkwIChhYnNvbHV0ZSBtb2RlKQ0K,test.ngc,9185c2c4f59803b6058093e3fc1250ec9f6bea42760874817af1e040e398fbab),If the call was successful and will receive upload_file:[ok],If any error occurs, will receive upload_file:error_message
In the example, file name is test.ngc.
- file contents are:
(Elephant Robotics)
G21 G94 G64 G40 (metric ftw)
G90 (absolute mode)
- base64 encoded contents are:
KEVsZXBoYW50IFJvYm90aWNzKQ0KRzIxIEc5NCBHNjQgRzQwIChtZXRyaWMgZnR3KQ0KRzkwIChhYnNvbHV0ZSBtb2RlKQ0K
- File name is for file name on robot, it does not have to be the same as on local computer.
If relative file name is specified, file will be saved under $HOME/RoboFlow/bin/upload folder.
For absolute file name, user should make sure the path is writable by user pi, otherwise upload file will fail.
- sha256 hash sum should be calculated for original file contents (not base64 encoded contents), for the above example, it is:
9185c2c4f59803b6058093e3fc1250ec9f6bea42760874817af1e040e398fbab
3 Socket API Usage Example
3.1 Create Blank Program
As shown in Figure 5-86, after powering on the robot, by clicking "Write Program" and "Blank Program" successively, you can enter the program creation page.

Fig. 5-86 Create Blank Program
3.2 Start to Monitor
As shown in Figure 5-87, by clicking "Tools", "Configuration", and "Network/Serial Port" in sequence, you can enter the API monitor page. You can enter the IP address of the TCP Server and set the port number, and you can run the ifcong command to view the IP address. You are advised to set the port number to 1024 to 49151.
Then by clicking the "Start" button, you can start to monitor the Socket API.
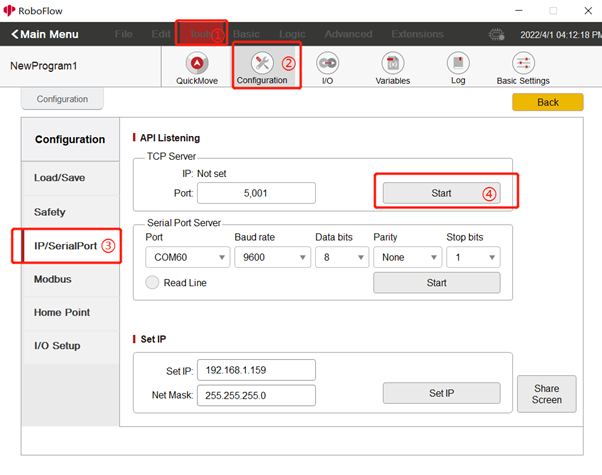
Fig. 5-87 Monitor Socket
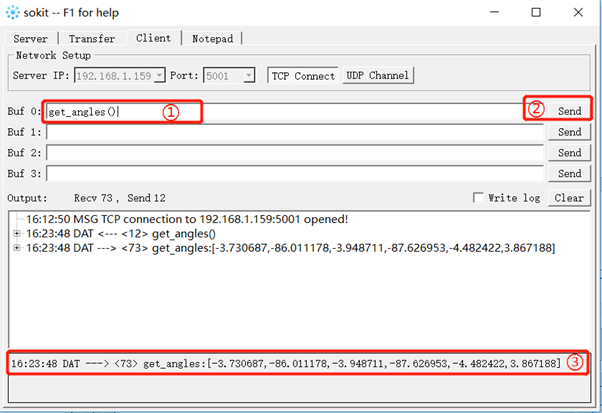
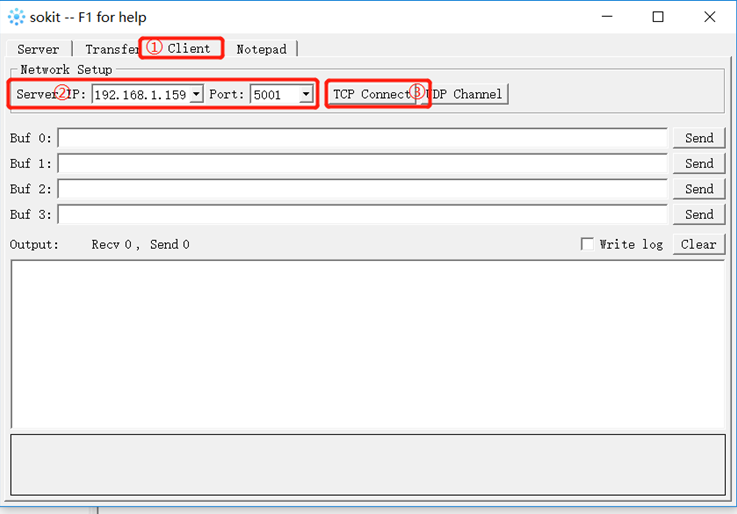
3.3 Connecting Robot with PC
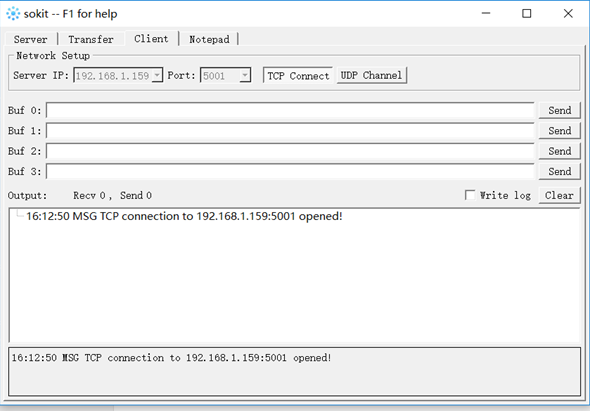
As shown in Figure 5-88, you can open the software "Sokit" on your PC terminal and click "Client" at the top of the software to enter the network setting page. The server address and port number can be the values set in RoboFlow and then you can click TCP connection to connect to the robot. If the connection is successful, information as shown in Figure 5-89 will be displayed.
3.4 Send Socket API
As shown in Figure 5-90, just by entering the Socket API that you want to send in the data window and clicking Send, the received information will be displayed in the sending and receiving records.